Sunday, December 12, 2010

The Twelve Cards of Christmas: Card 4

I hope everybody had a great weekend. Here is card 4 in my "Twelve Cards of Christmas" series. Thanks for looking!

Supplies: cardstock is Recollections (kraft), Georgia Pacific (white), and Bazzill (dark green Dotted Swiss); stamps are Sandylion (bicycle), KI Memories (tree and mittens), and I can't remember who made the merry Christmas stamp; ink is Tsukineko (Versafine Onyx black); images colored using Prismacolor markers; brads are Bazzill; ribbon is Creative Cafe; scallop border punch is EK Success; twine is Darice; white gel pen is Signo Uniball; sewing machine is Janome Sew Mini; thread is Singer; button is from Michael's

Friday, December 10, 2010

The Twelve Cards of Christmas: Card 3

Welcome, everybody! Here is the third card in my "Twelve Cards of Christmas" series. Enjoy!

Supplies: cardstock is Recollections; stamps are Hero Arts (reindeer and background) and Walmart ("warm wishes"); die-cut window is Nestabilities; inks are Joann (white), Tsukineko (Versafine Onyx black), and Clearsnap (Colorbox Scarlet red); ribbon is Creative Cafe; button is Michael's; reindeer colored in Prismacolor markers; glitter glue is Stickles by Ranger (Xmas Red on reindeer nose and sentiment, Frosted Lace on window); corner rounder is We R Memory Keepers Corner Chomper.

Thursday, December 9, 2010

The Twelve Cards of Christmas: Card 2

Here is the second card in my "Twelve Cards of Christmas" series. Thanks for looking!

Supplies: cardstock is Recollections (kraft) and Georgia Pacific (white), Plaid background stamp is Hero Arts, Santa and Merry Christmas stamps are Craftsmart for Michael's ($1 bin), inks are Tsukineko (Versamark for background and Versafine Onyx Black for Santa), patterned paper is Anna Griffin, die cut is Nestabilities Labels 13, image is colored using Prismacolor markers, glitter glue is Stickles by Ranger (Diamond color), Liquid Pearls by Ranger on hat trim, corner rounder is We R Memory Keepers Corner Chomper.

Wednesday, December 8, 2010

The Twelve Cards of Christmas: Card 1

Hello, everybody! Here is the first of my "Twelve Cards of Christmas" series. Hope you enjoy!

Supplies: cardstock is Recollections (kraft) and Georgia Pacific (white), stamps are Hero Arts (merry christmas) and Studio G by Hampton Art (Santa's clothesline), ink is Tsukineko (Versafine Onyx Black), ribbon is Creative Cafe, images colored using Prismacolor markers, corner rounder is We R Memory Keepers Corner Chomper, glitter glue is Stickles by Ranger (Frosted Lace and Goldenrod)

Monday, November 29, 2010

Happy Cyber Monday!

I hope everybody had a wonderful Thanksgiving. I've been outta touch with blogging lately, but I'll be back in the swing of things soon. I'm designing a card class to teach at my LSS, so I'll be posting the cards here soon. It's "The 12 Cards of Christmas". If you're here locally and are interested in the class(es), they're next week, December 6, 8, and 10 at Pages In Progress. I'll be doing 4 different cards each session. Sign up for one, two, or all three. I'd love to have you! And if you're not in the Tucson area, well just stay tuned... I'll be back to posting really soon!

Sunday, October 10, 2010

Happy Halloween card (and a challenge)

Well the weather here in southern Arizona is finally cooling off...and you know what that means!?! Halloween is coming! YAY! I absolutely LOVE all things Halloween! Well, I challenged myself to make a Halloween card without using any black...and here it is. I'm really pleased with the way it turned out. If any of you are so inclined, I'd love to see your take on a Halloween card using no black. Leave me a link in the comments, and I'll come check it out. Thanks for looking!
Supplies: kraft cardstock is Recollections, white cardstock (for stamped image) is Georgia Pacific, patterned papers are My Mind's Eye, image stamp is Stampin Up! ("Greeting Card Kids" set), colored with Prismacolor markers, sentiment stamp is The Paper Company Studio ("Jeepers Creepers" set), ink is Memento Rich Cocoa by Tsukineko, border punch is EK Success, corner rounder is We R Memory Keepers Corner Chomper, tulle is from Joann, twine is Darice, and the machine stitching was done with the Janome Sew Mini and Singer thread.
Close-up of stitching/tulle/sentiment:

Friday, September 10, 2010

Congratulations card

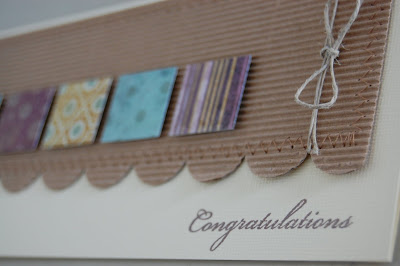
Hello, everybody! I don't know how the weather is where you are, but even here in hot ol' Arizona, you can feel a change in the air the past couple of days. Now don't get me wrong, we don't have a "fall" season here so I can't say that autumn is nearing, but when I mowed the lawn yesterday, it wasn't ridiculously hot! YAY! Anyway, I just love the colors in this line from My Mind's Eye So Sophie "Graceful" collection. They are so rich and warm, and have a lovely autumnal feeling to them. I can pretend right???

Supplies: Bazzill Chiffon cardstock, Creative Imaginations Corrugated Paper (Kraft), My Mind's Eye So Sophie "Graceful" patterned papers, Marvy square punch, EK Success scallop punch, American Crafts stamp, Tsukineko ink (Rich Cocoa), Darice hemp cording, machine stitching.
Another view. Each square is attached with a pop dot for more dimension. And if you were wondering about punching the corrugated paper, it was pretty easy with this punch, but I think I would avoid a more intricate border pattern. The paper is pretty thick, so a bigger, simpler pattern works best.
Thanks for looking!

Thursday, September 2, 2010

It's been too long

When I saw this giraffe stamp from Technique Tuesday, I immediately knew I wanted to use it on an A10 card. So, I added it to this card as part of my "Strictly Business" class for August. I really like the way it turned out. The finished size is 8.5" x 4". Thanks for looking!
Supplies: Brown cardstock is Bazzill, patterned papers are Bo Bunny and Jillibean Soup, stamps are Technique Tuesday, ink is Tsukineko, border punches are Martha Stewart and Fiskars, ribbons are Creative Imaginations, thread is Singer (machine stitching).
Another view:

Tuesday, August 31, 2010

i'm sorry card

Here is another card from my August "Strictly Business" card class. I really like shaped papers, but don't often get to use them on cards. I thought an A10 card (finished size is 9x4) would finally allow me to use those cute shaped papers, like this one from My Mind's Eye. Thanks for looking!
Supplies: Kraft and brown cardstocks are Bazzill, patterned paper is My Mind's Eye, flower punch and circle punch are Marvy, brads are Bazzill, ink (around edges) is Tim Holtz Distress in Antique Linen, Cricut Simply Sweet for sentiment, machine stitching

Sunday, August 29, 2010

tweet tweet

I hope everybody had a great weekend! Here is one of the cards I taught in my August "Strictly Business" card class. I recently learned how to sew, and now I'm outta control!! I'm sewing on everything I can get my hands on. So...you may notice that every project from now on will probably have some amount of sewing on it. While it did make kitting my class a bit of a chore, I think it was worth it. I think the gals in my class appreciated that it was all done for them. Anyway, the finished size of this card is 8.5" x 4". Isn't it tweet?
Supplies: patterned paper is American Crafts, cardstocks are Bazzill and American Crafts, stamp is CraftSmart (Michael's $1 bin), ink is Versafine Onyx, Prismacolor markers, circle punch is Marvy, ribbon is Creative Imaginations, Nestabilities Labels 6 and Petite Scalloped Circles, words are computer generated, stick pin is Dritz, "embossed" grid done with Scor-Pal, and machine stitching with Singer thread

Here is a close-up of the "embossed" grid. I used my Scor-Pal to score horizontal and vertical lines every 1/2". The "tweet tweet" was computer generated, and I cut the tag shape freehand. Thanks for looking!

Wednesday, August 18, 2010

u r sweet

Hi, everybody! Here is a card I made and taught in my "Strictly Business" class. The overall size is 9x4. Thanks for looking!

Supplies: cardstock is Georgia Pacific, patterned papers are My Mind's Eye, ribbon is Bazzill, border punches are EK Success and Martha Stewart, die cut label is Nestabilities, die cut strawberry is Cricut Indie Art, stamps are KI Memories, ink is Staz-On, glitter on strawberry is Stickles by Ranger.

Sunday, August 8, 2010

Wishing you were here

Here is another card I made as part of my "Strictly Business" card class. This card is 8.5" tall and 4" wide, and fits in a regular business-size envelope (hence the name of my class :)). I think it turned out pretty darn cute. I especially love the detail on this American Crafts stamp. Thanks for looking!

Supplies: cardstocks are Bazzill, patterned papers are October Afternoon, stamp is American Crafts, ink is Memories (cherry red), border punch is EK Success, corner rounder is WRMK Corner Chomper, ribbon is Bo Bunny, embossing folder is Cuttlebug (Moroccan screen), stick pins are Dritz, and red glitter glue is Stickles by Ranger.

Here's a close-up of the American Crafts stamp. I stamped it on the yellow patterned paper by October Afternoon, and then trimmed around it using Cutterbee scissors. Then I used Xmas Red Stickles on the word "YOU".

And here are my stick pins. They were originally a pearly red, but I added Stickles to them for a glittery effect.

Saturday, July 24, 2010

Play all day (mosaic layout)

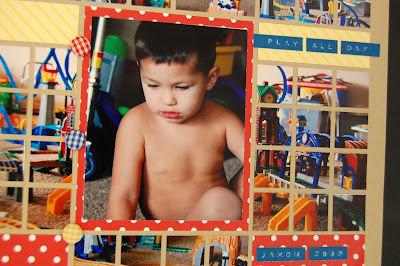
Here is another photo mosaic layout I did recently. I just loved these pictures of Jaxon (my LSS owner's grandson) and all his Geo-Trax, and I thought they'd make a great mosaic layout. I'm very pleased with the way it turned out. Thanks for looking!

Supplies: Kraft cardstock by Bazzill, patterned paper by Queen & Co., gingham brads by Making Memories, and Core'dinations cardstock for the title (I ran a strip through my Dymo punch label maker)
Sorry that first picture is kinda blurry. Here's a closer/clearer one:


Saturday, July 10, 2010

Have a dino-mite birthday (CPS sketch 174)

Ok, so it's my second time playing along with a sketch from Card Positioning Systems, and I'm really enjoying myself. Here is my card for sketch 174, which you can see here. This sketch was a great challenge for this linear brain of mine...I never skew or offset anything, so it was great to have a reason to do so. Thanks for looking!
The kraft cardstock is Recollections, all patterned papers are KI Memories, border punches are EK Success, dinosaur stamp is Prima stamped with Staz-On Timber Brown ink, glitter glue is Stickles by Ranger, ribbon is Basic Basic from Michael's, handwriting was done with American Crafts Memory Markers, stick pin is Dritz and the stopper on the tip is an earring back, machine stitched thread is Singer, and I used Prismacolor markers to color the dinosaur's scales and limbs.

Close-up of bow and pin:
Another view:

Saturday, July 3, 2010

hello sweet baby

Here is a baby card I made as part of a class I'm teaching called "Strictly Business", which features cards that fit in a business-size envelope (or A10). The stamp is by Technique Tuesday and reads "hello sweet baby: the world is a bit brighter now that you are here". The elephant die cut is from the Cricut Holiday Cakes cartridge. Cardstocks are Bazzill and Georgia Pacific, patterned paper is My Mind's Eye Lush Collection, ink is Staz-On Jet Black, buttons are Creative Imaginations, floss is DMC, scallop border punch is EK Success, ribbon is American Crafts, flocking on the elephant's ear is Fun Flock by Stampendous and is adhered with Glossy Accents by Ranger, corner rounder is We-R-Memory Keepers Corner Chomper. Thanks for looking!

***Edited to add the measurements*** This card measures 9 inches long by 4 inches wide, so the base cardstock was cut at 9 x 8 and folded in half. Thanks to Victoria for the comment :)


Monday, June 28, 2010

Thinking of you

Hello, everybody! Here is a card I made using a sketch from Card Positioning Systems. I've never really used card sketches, but have been eyeballing their sketches for awhile now. After seeing all the great sketches and what the fabulous designers do with them, I decided to take a shot at it. For this card, I used last week's sketch (number 172, which you can see here). I changed a couple of the elements up a little bit, but I think it still works for the sketch. This card measures 9 inches tall x 4 inches wide, and fits in a standard business size (A10) envelope.

Here's a close-up of the Versamark background. If you've never used Versamark, you should! LOL...it's a watermark ink, so it just makes a very subtle background, but it adds some visual interest without adding a distracting color. It's also very slow-drying, so it's great to use with embossing powders.

And here's a close-up of the cute little "hi" stamp. Oh yeah...by the way...this stamp is the one I used with the Versamark for the yellow background. I love how the word "hi" didn't show up using the Versamark and made my little stamp that much more versatile. YAY!!! :)
Here are the deets (details...yes, I know I'm a nerd...lol) : cardstocks are Bazzill, patterned paper is The Girls' Paperie, stamps are KI Memories, inks are Versamark (for creating the background on the yellow cardstock) and Staz-On Timber Brown, the dark blue strip was cut at the bottom using Nestabilities Labels 9 and embossed with Cuttlebug Swiss Dots, notebook border punch (sorry, don't know the real name) is EK Success, ribbon is Bazzill, hemp cord is Darice, corner rounder is We-R-Memory Keepers Corner Chomper, and the brown pen for the little accent dots is American Crafts.
Thanks for looking!

Sunday, June 27, 2010

{azaleas} photo mosaic layout

Here is another photo mosaic layout (as promised). I used these great pictures my mom took when my parents visited our relatives in Oklahoma this past April. I just love these pictures of the beautiful azaleas in bloom and all the lush greenery. I used Bazzill cardstock in Kraft and Raven. For the title, I used white chipboard Thickers by American Crafts, but glitzed them up a bit with some Frosted Lace Stickles glitter glue by Ranger.
Here is a close-up. I don't know if you can see the glitter all that well, but it sure does look pretty in real life :)
Thanks for looking! And again, you can click on any picture to enlarge it.

Monday, May 31, 2010

The great outdoors

Hello, everybody! I'm so sorry I haven't posted anything in the last couple of months. Things have been kinda crazy around here, but I've recently completed a few projects and will be posting them in the next few days. Thanks for being patient with me. Hopefully you'll enjoy these projects. I've been on a photo mosaic kick, and it's really helped me get some pictures down on paper. This first one is called "The great outdoors" and I used some pictures I took here in southern Arizona. I used Bazzill cardstock for the base, the black squares, and the title. The title was cut using the Cricut Expression and the "Opposites Attract" cartridge. Thanks for looking!

Wednesday, February 24, 2010

"Delightful little things" shadowbox

Okay, so I've never done a project quite like this one before, but I must say, I am quite pleased with how it turned out. And guess what...I actually put MY pictures in it, and I'm KEEPING it!!! That's huge for me, since most of what I make I give to other people. I don't even have a scrapbook of my own pictures, but I've made plenty for others. Anyway, here is a shadowbox that I made into a piece of "scrapbook-related home decor." The box itself has an overall size of 11" x 14", and is divided into 12 compartments. It came with glass, but I removed it. Here is a little peek...


The inspiration for my title came from one of the stamps I used on it. The set is from Technique Tuesday, and it is just fantastic. So many stamps are geared towards card-making, but this set is awesome for scrapbooking. And I got SO MUCH use out of it. Here is my inspiration: "Memories are delightful little things"

And here is my finished product, minus pictures. ***I will be teaching this project as a class at my LSS, Pages In Progress, on Saturday, March 13, 2010. Space is very limited (10 seats), so if you're in Tucson or the surrounding areas and want to take this class, please contact the store. Cost is $45, and it includes the shadowbox. Everything will come pre-cut, stamped, punched, embossed, etc. All you need to do is assemble and add your pictures.*** Sorry for the shameless plug... anyway, here is the shadowbox completely decorated, minus pictures. (You can click on the picture to enlarge it and see more detail)

Here are my pictures of my beautiful boys. The actual shadowbox is not shown in the next two pictures.

Thanks for looking! And again, if you are in southern Arizona and would like to take this class, please contact Pages In Progress. Reserve your seat early! :)