Showing posts with label Bazzill. Show all posts

Friday, September 10, 2010

Congratulations card

Hello, everybody! I don't know how the weather is where you are, but even here in hot ol' Arizona, you can feel a change in the air the past couple of days. Now don't get me wrong, we don't have a "fall" season here so I can't say that autumn is nearing, but when I mowed the lawn yesterday, it wasn't ridiculously hot! YAY! Anyway, I just love the colors in this line from My Mind's Eye So Sophie "Graceful" collection. They are so rich and warm, and have a lovely autumnal feeling to them. I can pretend right???

Supplies: Bazzill Chiffon cardstock, Creative Imaginations Corrugated Paper (Kraft), My Mind's Eye So Sophie "Graceful" patterned papers, Marvy square punch, EK Success scallop punch, American Crafts stamp, Tsukineko ink (Rich Cocoa), Darice hemp cording, machine stitching.
Another view. Each square is attached with a pop dot for more dimension. And if you were wondering about punching the corrugated paper, it was pretty easy with this punch, but I think I would avoid a more intricate border pattern. The paper is pretty thick, so a bigger, simpler pattern works best.
Thanks for looking!

Thursday, September 2, 2010

It's been too long

When I saw this giraffe stamp from Technique Tuesday, I immediately knew I wanted to use it on an A10 card. So, I added it to this card as part of my "Strictly Business" class for August. I really like the way it turned out. The finished size is 8.5" x 4". Thanks for looking!
Supplies: Brown cardstock is Bazzill, patterned papers are Bo Bunny and Jillibean Soup, stamps are Technique Tuesday, ink is Tsukineko, border punches are Martha Stewart and Fiskars, ribbons are Creative Imaginations, thread is Singer (machine stitching).
Another view:

Tuesday, August 31, 2010

i'm sorry card

Here is another card from my August "Strictly Business" card class. I really like shaped papers, but don't often get to use them on cards. I thought an A10 card (finished size is 9x4) would finally allow me to use those cute shaped papers, like this one from My Mind's Eye. Thanks for looking!
Supplies: Kraft and brown cardstocks are Bazzill, patterned paper is My Mind's Eye, flower punch and circle punch are Marvy, brads are Bazzill, ink (around edges) is Tim Holtz Distress in Antique Linen, Cricut Simply Sweet for sentiment, machine stitching

Sunday, August 29, 2010

tweet tweet

I hope everybody had a great weekend! Here is one of the cards I taught in my August "Strictly Business" card class. I recently learned how to sew, and now I'm outta control!! I'm sewing on everything I can get my hands on. So...you may notice that every project from now on will probably have some amount of sewing on it. While it did make kitting my class a bit of a chore, I think it was worth it. I think the gals in my class appreciated that it was all done for them. Anyway, the finished size of this card is 8.5" x 4". Isn't it tweet?
Supplies: patterned paper is American Crafts, cardstocks are Bazzill and American Crafts, stamp is CraftSmart (Michael's $1 bin), ink is Versafine Onyx, Prismacolor markers, circle punch is Marvy, ribbon is Creative Imaginations, Nestabilities Labels 6 and Petite Scalloped Circles, words are computer generated, stick pin is Dritz, "embossed" grid done with Scor-Pal, and machine stitching with Singer thread

Here is a close-up of the "embossed" grid. I used my Scor-Pal to score horizontal and vertical lines every 1/2". The "tweet tweet" was computer generated, and I cut the tag shape freehand. Thanks for looking!

Wednesday, August 18, 2010

u r sweet

Hi, everybody! Here is a card I made and taught in my "Strictly Business" class. The overall size is 9x4. Thanks for looking!

Supplies: cardstock is Georgia Pacific, patterned papers are My Mind's Eye, ribbon is Bazzill, border punches are EK Success and Martha Stewart, die cut label is Nestabilities, die cut strawberry is Cricut Indie Art, stamps are KI Memories, ink is Staz-On, glitter on strawberry is Stickles by Ranger.

Sunday, August 8, 2010

Wishing you were here

Here is another card I made as part of my "Strictly Business" card class. This card is 8.5" tall and 4" wide, and fits in a regular business-size envelope (hence the name of my class :)). I think it turned out pretty darn cute. I especially love the detail on this American Crafts stamp. Thanks for looking!

Supplies: cardstocks are Bazzill, patterned papers are October Afternoon, stamp is American Crafts, ink is Memories (cherry red), border punch is EK Success, corner rounder is WRMK Corner Chomper, ribbon is Bo Bunny, embossing folder is Cuttlebug (Moroccan screen), stick pins are Dritz, and red glitter glue is Stickles by Ranger.

Here's a close-up of the American Crafts stamp. I stamped it on the yellow patterned paper by October Afternoon, and then trimmed around it using Cutterbee scissors. Then I used Xmas Red Stickles on the word "YOU".

And here are my stick pins. They were originally a pearly red, but I added Stickles to them for a glittery effect.

Saturday, July 24, 2010

Play all day (mosaic layout)

Here is another photo mosaic layout I did recently. I just loved these pictures of Jaxon (my LSS owner's grandson) and all his Geo-Trax, and I thought they'd make a great mosaic layout. I'm very pleased with the way it turned out. Thanks for looking!

Supplies: Kraft cardstock by Bazzill, patterned paper by Queen & Co., gingham brads by Making Memories, and Core'dinations cardstock for the title (I ran a strip through my Dymo punch label maker)
Sorry that first picture is kinda blurry. Here's a closer/clearer one:


Saturday, July 3, 2010

hello sweet baby

Here is a baby card I made as part of a class I'm teaching called "Strictly Business", which features cards that fit in a business-size envelope (or A10). The stamp is by Technique Tuesday and reads "hello sweet baby: the world is a bit brighter now that you are here". The elephant die cut is from the Cricut Holiday Cakes cartridge. Cardstocks are Bazzill and Georgia Pacific, patterned paper is My Mind's Eye Lush Collection, ink is Staz-On Jet Black, buttons are Creative Imaginations, floss is DMC, scallop border punch is EK Success, ribbon is American Crafts, flocking on the elephant's ear is Fun Flock by Stampendous and is adhered with Glossy Accents by Ranger, corner rounder is We-R-Memory Keepers Corner Chomper. Thanks for looking!

***Edited to add the measurements*** This card measures 9 inches long by 4 inches wide, so the base cardstock was cut at 9 x 8 and folded in half. Thanks to Victoria for the comment :)


Monday, June 28, 2010

Thinking of you

Hello, everybody! Here is a card I made using a sketch from Card Positioning Systems. I've never really used card sketches, but have been eyeballing their sketches for awhile now. After seeing all the great sketches and what the fabulous designers do with them, I decided to take a shot at it. For this card, I used last week's sketch (number 172, which you can see here). I changed a couple of the elements up a little bit, but I think it still works for the sketch. This card measures 9 inches tall x 4 inches wide, and fits in a standard business size (A10) envelope.

Here's a close-up of the Versamark background. If you've never used Versamark, you should! LOL...it's a watermark ink, so it just makes a very subtle background, but it adds some visual interest without adding a distracting color. It's also very slow-drying, so it's great to use with embossing powders.

And here's a close-up of the cute little "hi" stamp. Oh yeah...by the way...this stamp is the one I used with the Versamark for the yellow background. I love how the word "hi" didn't show up using the Versamark and made my little stamp that much more versatile. YAY!!! :)
Here are the deets (details...yes, I know I'm a nerd...lol) : cardstocks are Bazzill, patterned paper is The Girls' Paperie, stamps are KI Memories, inks are Versamark (for creating the background on the yellow cardstock) and Staz-On Timber Brown, the dark blue strip was cut at the bottom using Nestabilities Labels 9 and embossed with Cuttlebug Swiss Dots, notebook border punch (sorry, don't know the real name) is EK Success, ribbon is Bazzill, hemp cord is Darice, corner rounder is We-R-Memory Keepers Corner Chomper, and the brown pen for the little accent dots is American Crafts.
Thanks for looking!

Sunday, June 27, 2010

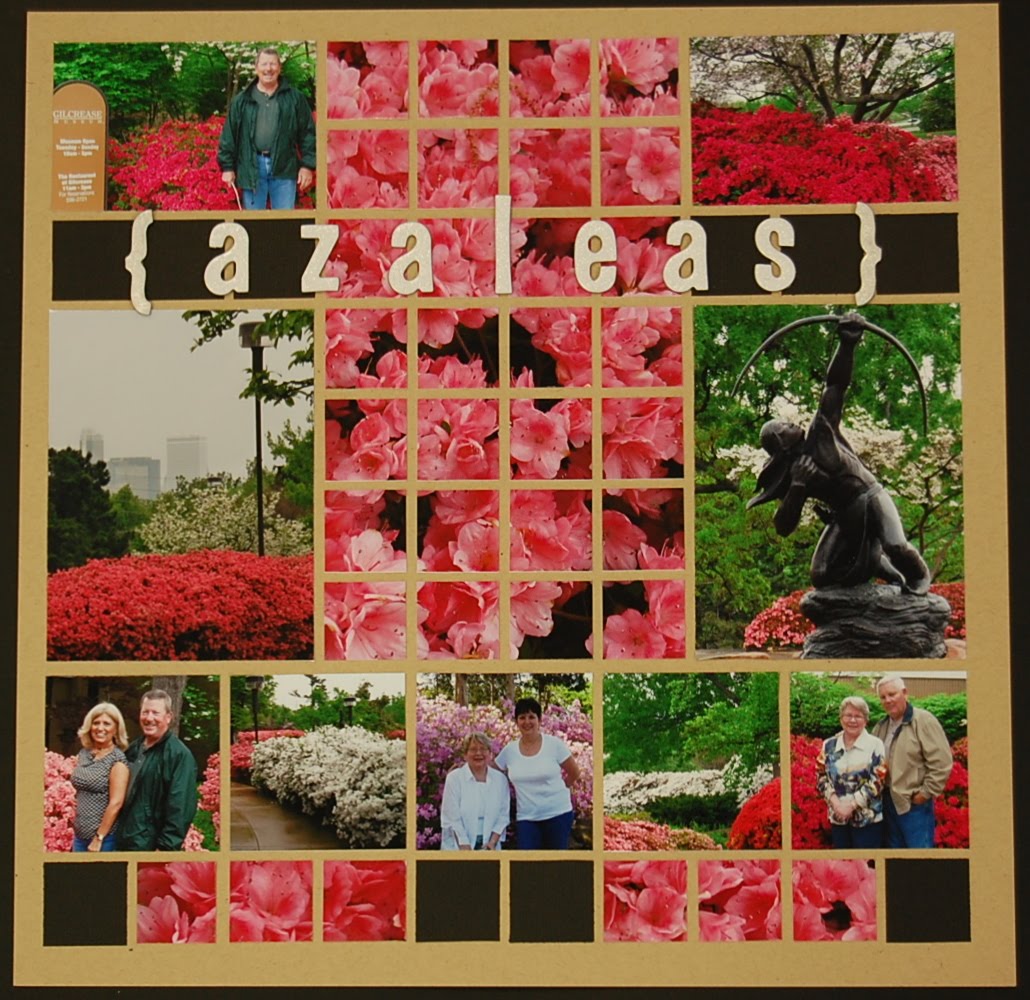
{azaleas} photo mosaic layout

Here is another photo mosaic layout (as promised). I used these great pictures my mom took when my parents visited our relatives in Oklahoma this past April. I just love these pictures of the beautiful azaleas in bloom and all the lush greenery. I used Bazzill cardstock in Kraft and Raven. For the title, I used white chipboard Thickers by American Crafts, but glitzed them up a bit with some Frosted Lace Stickles glitter glue by Ranger.
Here is a close-up. I don't know if you can see the glitter all that well, but it sure does look pretty in real life :)
Thanks for looking! And again, you can click on any picture to enlarge it.

Monday, May 31, 2010

The great outdoors

Hello, everybody! I'm so sorry I haven't posted anything in the last couple of months. Things have been kinda crazy around here, but I've recently completed a few projects and will be posting them in the next few days. Thanks for being patient with me. Hopefully you'll enjoy these projects. I've been on a photo mosaic kick, and it's really helped me get some pictures down on paper. This first one is called "The great outdoors" and I used some pictures I took here in southern Arizona. I used Bazzill cardstock for the base, the black squares, and the title. The title was cut using the Cricut Expression and the "Opposites Attract" cartridge. Thanks for looking!

Friday, November 6, 2009

A birthday tip...have your cake and eat it too

Here is a cute little card I made using up some paper scraps I had after making an altered project. I also found in my stash a sheet of vintage birthday stickers by Pebbles Inc., and thought this little sticker was perfect for my card. Kraft paper for the card base is Bazzill, and the patterned papers are from a JoAnn alterable kit. Ribbon is from my stash, the border punch along the bottom is Fiskars Apron Lace, and although it is hard to see in these pics, I used a Martha Stewart punch along the bottom of the pale pink patterned paper.

Another view:

Fiskars Apron Lace border punch:

Friday, September 18, 2009

I'm over the moon for you

Here is another card I made using the adorable stamp set from Sandylion (scroll down a few posts to see the set). I wanted to make a boyish card for my husband, so I picked the rocket ship stamp. I really liked the color scheme and pattern of this SEI paper (even though it's a Christmas line and it's kinda old). The blue pattern at the bottom of the card is the back side of the top pattern. The green polka dot strip is Three Bugs in a Rug. The cardstock for the base is Bazzill, and the cardstock that the stamped image is on is Georgia Pacific. I colored in the ship using Prismacolor markers, and accented using Black Diamond Stickles. I used a Heidi Swapp distresser on the edges of the papers, and the holes along the bottom are an EK Success border punch. The ribbon used for the rocket's vapor trail is Making Memories, along with the plastic glittered brackets and star sticker. The lined paper on which I wrote my sentiment is simple notebook paper that I cut down, leaving the messy "notebook" edge, and inked with Tim Holtz distress ink. The black pen I used for the sentiment is a Sakura Gelly Roll pen. Thanks for looking!

Here's a close-up of the rocket ship, colored with Prismacolor markers and accented with Black Diamond Stickles. I used thin pop-dots underneath to give it just a bit of dimension:

Here's a close-up of the notebook paper, plastic glitter stickers, and ribbon:


Tuesday, September 15, 2009

sweet baby boy card

So, a few posts back (titled "i'm not lion"), I showed a set of Sandylion stamps that are just too cute. I said I had made some more cards using other stamps in that set, and that I would post pics later. Well...later has arrived. This card uses the monkey stamp, and I LOVE HIM! I stamped him onto white Georgia Pacific cardstock using Black Staz-On ink, and then colored him in with Prismacolor markers. I stamped him again onto the striped paper, and cut out only the belly part (which I thought would be cute as a bib), and paper-pieced the "bib" onto the monkey. I then cut around the image with my Cutterbee scissors. The striped paper is by Three Bugs in a Rug, the blue dotted paper is Bo Bunny, and the kraft colored cardstock is Bazzill. The loopy punch is Martha Stewart, and the large scalloped punch along the bottom is EK Success. I used some letter stamps by KI Memories to stamp the word "sweet" in white ink, then I covered the letters with white Fun Flock by Stampendous, using Glossy Accents as my adhesive for the flocking. Ribbons are by American Crafts and Offray, and they are stapled to the card. Pearls are from Kaiser Craft, and the brown pen for the dots is American Crafts. Isn't he SWEET???

Here you can kinda see where I layered the "bib" using a pop dot to make it stand out a bit.

Here's a close-up of the Fun Flock. For those who've never used flocking, it's basically the same concept as using glitter, but instead of a sparkly look, it gives you a fuzzy look and feel. You can see the fuzziness here:

I'm nuts about you

I bought a bunch of scalloped Bazzill cardstock last year sometime, and have never used it (it got lost in the stash)...until now! It was a lot of fun to use on this card. It already had the holes in it too, so I triple-stitched them with white floss. The base cardstock is also Bazzill, and the white cardstock that the squirrel is on is Georgia Pacific. The patterned papers are Three Bugs in a Rug. The squirrel stamp is by Recollections, and stamped with Staz-On Timber Brown ink. I colored it in with Prismacolor markers. The ribbon is Offray, and the brown pen I used on the sentiment is American Crafts. Finished size is 4.5" x 6". Thanks for looking!
Here's a close-up of my squirrel. I stamped him (a pink squirrel can be a boy, right?) on Georgia Pacific cardstock, and then cut him out using my Cutterbee scissors. If you don't have a pair yet, GET ONE! They are sharp to the very tip, and therefore great for making small, detailed cuts. Anyway, I then adhered the squirrel to another piece of Georgia Pacific cardstock, cut at 2" x 2". I rounded the corners with a Marvy punch.
And here's just another view:

Sunday, August 30, 2009

i'm not lion...

I bought the cutest set of Sandylion stamps a few months ago, and just recently used them for the first time. Now usually, I'm not the biggest fan of Sandylion products, but this set from Michael's was just too cute to pass up. Here's what the set looks like, and for this card I used the adorable lion up near the top. I have also made cards using the monkey and rocket ship, and will post those later.
Now, my father-in-law just had surgery, so I made him a get well card. First, I stamped the lion onto white Georgia Pacific cardstock using Timber Brown Staz-On ink. Then I colored him in with Prismacolor markers that matched the background paper I used. The patterned papers are Cosmo Cricket, and the cardstock for the base is Bazzill. The bottom zig-zag border punch is EK Success, and the two scalloped patterns are Martha Stewart border punches. Stick pins are Dritz, and I used earring backs to cap the points. I used my Marvy Uchida corner rounder on the top corners of the card and patterned papers. Ribbon is from my stash, and the brown pen is American Crafts. I wrote the words "i'm not lion..." on the front of the card...
...and here's the inside of the card. It reads "...i hope you feel better soon".
Here's a close-up of the cute little guy:
Another view:

Friday, August 28, 2009

hello card

Here is the first card I've ever SEWN on! YAY!!! I'm so excited - been wanting to sew on cards/layouts for so long. The thing is...I SUCK at sewing. I just cannot sew a straight line to save my life. So when the sewing on this card actually came out somewhat straight, I was thrilled. Anyway...the cardstock is Bazzill, patterned paper is Scenic Route, the border punch is EK Success, brads are Making Memories, and the letter stickers and felt heart are American Crafts. The green paper is the back side of the patterned paper, and I distressed and sanded the edges. Thanks for looking!
Here's a close-up of the heart, letters, and brads:

Thursday, August 27, 2009

Welcome baby

Here is a cute baby card I made, using Coredinations cardstock for the first time. Gotta say, I love it! The kraft cardstock and green cardstock are Bazzill. Pink cardstock is Coredinations (from the whitewash collection), patterned paper is Three Bugs in a Rug. The chipboard elephant is KI Memories. The white cardstock behind the elephant is Georgia Pacific, and it's cut with Provo Craft scalloped scissors. The green oval is a punch, and I pierced holes around it. Border punches used on the bottom are Martha Stewart, Fiskars, and EK Success. The ribbon is from Michael's $1 bin. The white rub-on letters are American Crafts. Thanks for looking!
Here is a close-up of the elephant. I used foam tape behind the green oval to pop it up.

Sunday, August 23, 2009

Wedding invitation samples

So, one of the guys I work with is getting married next August, and I'm making their wedding invitations. So I made up a little display to give them some ideas of what I can do. This is a 12x12 piece of kraft colored cardstock. I stamped their names with KI Memories stamps using black Staz-On ink and Joann's white pigment. I went over the ink with Black Diamond Stickles and Frosted Lace Stickles. Below that, I put a little swatch of the 3 colors they will be using, which are dark purple, white, and pear green. Below the swatches are strips of matching ribbons. To the right are some cute font samples (all free downloads from http://www.kevinandamanda.com/). On the bottom are some border strips I punched that can be used on invitations, programs, favors, etc. The punches are by Martha Stewart and Fiskars.To the right, I stamped a little wedding cake (KI Memories) in white ink and topped it with more Frosted Lace Stickles. The cake stand is a Cuttlebug die, and I drew the heart on top of the cake with a purple Gelly Roll pen.
This first sample is very simple, and could be used as invitation or a program. Both pieces are AccuCuts dies, and I rounded the corners of the green piece. I don't know if it shows up in the picture, but I embossed a row of dots at the top and bottom using a Cuttlebug border embossing folder. I don't know the exact measurements, but it fits in a business size envelope.
The next sample features a purple base with white cardstock on top. I punched a strip of green paper with a Martha Stewart punch, and put some purple ribbon above that. Finished size is 5"x7".
The third sample is another AccuCuts die, cut out of the green paper. It has a white cardstock piece on the inside, and is wrapped with a purple strip that I punched with a Martha Stewart edge punch. I topped it off with some green polka-dot ribbon. Finished size is 5"x7".
Here's a picture of everything I made to give to them. I think everything turned out pretty darn cute, and they really liked it too.


Wednesday, March 11, 2009

February Cuttlebug card class

Yes, you read that right. These are the cards from my February card class "I heart Cuttlebug cards." I'm just a little behind on my blogging...again {sheepish grin}. Anyway, I think these cards came out pretty darn cute, and I think all the ladies in the class enjoyed learning new ways to use the Cuttlebug.

On this first card, I wanted to show the gals to think outside the "you can only emboss paper" box. We embossed acetate (report covers from Office Max), and placed it over a white card base. On this card, we used the Perfectly Paisley embossing folder, as well as a Cuttlebug die. The die is from the Halloween sign cut/emboss combo set. The green polka dot paper is from 3 Bugs in a Rug, and we added a stamp from Hero Arts. We topped it off with some pink grosgrain ribbon, and voila!
Here's a close-up of the Halloween sign die and the stamp (stamped with Staz-On ink):

This card (which I think is too cute!) was inspired by SusieB from the Cricut website (check out her awesome Cuttlebug gallery by clicking her link on my sidebar). On this card, I wanted to show my students how to paper-piece using the Cuttlebug. The "medallion" that the little sheep is stamped on was from a Splitcoaststampers.com tutorial. You can make one yourself with any border/edge punch (this one is Martha Stewart). I took a 3-inch square piece of white cardstock and used the border punch one time on each side of the square. Then I just backed this piece with a 3-inch square piece of green gingham paper by American Crafts. I stamped the little sheep (which is a Studio G stamp) with Staz-On ink in the center of the "medallion", and colored him (or her?) in with Prismacolor markers. Then I stamped him again on a scrap piece of white cardstock, and ran it through the Cuttlebug (using the Tiny Bubbles embossing folder). Out of the embossed piece, I cut out all his "woolly parts" (hee hee) and pieced them on top of the colored-in image on the "medallion". The yellow border is also punched with the same Martha punch, and embossed with one of the Cuttlebug border embossing folders.
Here's a close-up of his fluffy embossed body and tuft of wool on his head. Isn't he the cutest???
On this next card, I wanted to show the ladies how, if you emboss on a white-core paper and use a sanding block, the white core will show through. The patterned paper is American Crafts, and the pink is the back side of the dotted paper. I cut out a pink circle using the Fiskars circle cutter, then embossed the pink side with the ice cream cone folder from the "Birthday Jelly" set. I used the argyle embossing folder on Bazzill cardstock for the background, because it reminded me of a waffle cone. I pleated some white ribbon on either side of the ice cream cone, and stapled over the pleats to give the ribbon a little more visual interest.
Here is a close-up of the argyle embossing and the patterned paper, which I also sanded around the edges to reveal the white core. I used a brown pen to make small dots around the edge of the pink layered piece:
And here's a close-up of the sanded ice cream cone and the pleated/stapled ribbon:
Last, but certainly not least, I wanted to show the ladies that you can emboss chipboard, and also show them how to emboss on paper that is larger than the embossing folder. The frame and it's center are both chipboard, with the outer piece of the frame being covered with patterned paper by 3 Bugs in a Rug. The center of the frame was embossed, and then I went over the raised part with some white ink by Making Memories.
To emboss a piece of paper that is larger than the embossing folder, I used my Scor-Pal to score 2 parallel lines across the middle of my card. Then I aligned the side of the Swiss Dots embossing folder with the top score line, and ran the paper and folder through the Cuttlebug. Then I did the same thing on the bottom half of the card. I finished it off with some ribbon by American Crafts. Here it is:
Here's a close-up of the chipboard frame and embossing: